Plyo boxes are central to explosive training, with readily available 16x20x24 plyo box plans PDF online. These plans empower fitness enthusiasts to build robust, customizable equipment.
What is a Plyo Box?
A plyo box, fundamentally, is a sturdy platform utilized for a variety of explosive exercises, often featured in 16x20x24 plyo box plans PDF guides. These boxes facilitate movements like box jumps, step-ups, and depth jumps, crucial for developing power and athleticism. Commonly constructed from wood, their dimensions – 16, 20, and 24 inches – cater to diverse skill levels and training goals.
The availability of detailed plans, like those found in PDF format, allows individuals to construct their own, ensuring a customized fit for their workout space and needs. They are a cornerstone of plyometric training, enhancing speed, strength, and overall athletic performance.
Benefits of Plyometric Training
Plyometric training, often enhanced by utilizing a box built from 16x20x24 plyo box plans PDF, delivers significant athletic advantages. It improves explosive power, crucial for sports requiring rapid acceleration and jumping ability. Beyond power, plyometrics boosts speed, agility, and coordination, conditioning both muscles and the cardiovascular system.
This training method enhances neuromuscular efficiency, allowing for quicker reaction times and more forceful movements. Integrating plyometrics, facilitated by a self-built box, can elevate fitness routines, offering benefits for casual enthusiasts and elite athletes alike, improving overall performance.
Why Build Your Own? (Cost & Customization)
Utilizing 16x20x24 plyo box plans PDF offers substantial cost savings compared to purchasing pre-made boxes. Commercial options can be expensive, while DIY construction, using readily available lumber, significantly reduces expenditure. Beyond affordability, building your own allows for complete customization.
You can tailor dimensions, reinforcing techniques, and finishes to precisely match your skill level and training needs. Modifying plans ensures the box perfectly suits your space and workout style. This personalized approach, guided by the PDF, delivers a superior training experience.

Understanding Plyo Box Dimensions: 16x20x24
16x20x24 plyo box plans PDF detail common heights for varied skill levels, offering progressive training. Understanding these dimensions is crucial for safe, effective workouts.
The Significance of 16″, 20″, and 24″ Heights
Plyo box plans PDF often feature 16″, 20″, and 24″ heights, catering to different fitness levels and training goals. The 16″ box is ideal for beginners, focusing on foundational technique and lower impact.
Progressing to the 20″ height increases the challenge, building explosive power. Finally, the 24″ box is suited for advanced athletes seeking maximum force development. These varying heights allow for progressive overload, minimizing injury risk while maximizing gains.
Choosing the correct height, guided by 16x20x24 plyo box plans PDF, is paramount for safe and effective plyometric training.
User Skill Level & Appropriate Box Height
Selecting the right plyo box height, as detailed in 16x20x24 plyo box plans PDF, hinges on individual skill level. Beginners should start with the 16″ box, mastering landing mechanics and building a base of strength.
Intermediate athletes can transition to the 20″ height, increasing the intensity and challenge. Advanced users, with established plyometric experience, can utilize the 24″ box for maximal power output;
Ignoring this progression, even with detailed plyo box plans PDF, increases injury risk. Proper height selection ensures safe and effective training.
Safety Considerations Based on Dimensions
When utilizing 16x20x24 plyo box plans PDF, safety is paramount. The 24″ height demands greater landing proficiency, requiring ample space and a controlled descent. A stable surface is crucial; ensure the box doesn’t wobble during use.
Regardless of height, always warm up thoroughly before plyometrics. Inspect the box regularly for structural integrity, referencing your plyo box plans PDF for construction details.
Consider adding non-slip surfaces. Proper form and progressive overload, guided by the plans, minimize injury risk.

Materials Needed for Construction
16x20x24 plyo box plans PDF necessitate plywood, screws, wood glue, and tools like saws and drills for a durable, safe build.
Wood Selection (Plywood Grades)
Selecting the right plywood is crucial when following 16x20x24 plyo box plans PDF. For optimal strength and longevity, consider high-quality plywood grades. Baltic birch plywood is a premium choice, known for its exceptional durability and void-free construction, making it ideal for demanding plyometric use.
Alternatively, hardwood plywood like maple or birch offers a good balance of strength and cost-effectiveness. Avoid construction-grade plywood, as it often contains voids and inconsistencies that compromise structural integrity. A ¾ inch thickness is generally recommended for all plywood pieces to withstand repeated impact. Carefully inspect each sheet for defects before cutting, ensuring a robust and safe plyo box.
Fasteners (Screws, Nails, Wood Glue)
When building from 16x20x24 plyo box plans PDF, fastener selection is paramount for structural integrity. Wood glue, specifically a high-quality PVA wood glue, is essential for bonding plywood pieces, creating a strong initial hold. Complement this with screws – 2 ½ inch to 3-inch wood screws are recommended for secure assembly.
Avoid nails, as they lack the holding power needed for repeated impact. Predrill pilot holes before screwing to prevent splitting the plywood. Countersink the screws for a flush finish and to minimize injury risk. Generous glue application combined with strategically placed screws ensures a durable and safe plyo box.
Tools Required (Saw, Drill, Measuring Tape, Sander)
Successfully executing 16x20x24 plyo box plans PDF demands specific tools. A circular saw or table saw is crucial for accurate plywood cutting. A power drill, equipped with drill bits and screwdriver heads, is essential for assembling the box with screws. Precise measurements require a reliable measuring tape, ensuring all cuts align with the plans.
A sander – orbital or sanding block – smooths rough edges, preventing splinters and injuries. Safety glasses and a dust mask are vital for protection. Clamps aid in holding pieces together during glue-up. These tools, combined with careful execution, guarantee a robust plyo box.

Detailed 16x20x24 Plyo Box Plans ‒ Step-by-Step
16x20x24 plyo box plans PDF guide construction: cut plywood, assemble the frame securely, reinforce with internal braces, and finish for durability.
Cutting the Wood Pieces (Dimensions & Quantity)
Utilizing a 16x20x24 plyo box plans PDF requires precise cuts. You’ll need six plywood pieces. Cut two pieces at 16″ x 16″ for the ends, two at 20″ x 16″ for the sides, and one at 24″ x 20″ for the top. Finally, cut one piece at 16″ x 20″ for the base.
Ensure accurate measurements; slight errors accumulate. Use a circular saw or table saw for straight, clean cuts. Double-check dimensions against your chosen PDF before cutting. Consider plywood thickness – ¾” is standard for strength. Label each piece immediately after cutting to avoid assembly confusion. Safety glasses are crucial during this step!
Assembling the Box Frame (Base, Sides, Top)
Following your 16x20x24 plyo box plans PDF, begin by attaching the sides (20″ x 16″) to the base (16″ x 20″) using wood glue and screws. Ensure 90-degree angles for a stable structure. Next, secure the end pieces (16″ x 16″) to the sides and base, again with glue and screws.
Finally, attach the top piece (24″ x 20″) to complete the box frame. Clamps are invaluable here, holding pieces firmly while the glue dries. Pre-drilling screw holes prevents wood splitting. Regularly check for squareness throughout assembly, referencing your PDF for guidance.
Reinforcing the Structure (Internal Braces)
Your 16x20x24 plyo box plans PDF likely details internal bracing for enhanced durability. Cut braces from plywood (dimensions specified in the PDF) and position them inside the box, typically along the sides and base. Apply wood glue liberally to all contact points before securing with screws.
These braces prevent racking and distribute weight more evenly. Pay close attention to brace placement as shown in the PDF diagrams. Adequate bracing is crucial, especially for higher impact exercises. Consider adding braces to the top as well for maximum stability.
Construction Techniques for Durability
16x20x24 plyo box plans PDF emphasize strong joints. Utilize ample wood glue, correctly spaced screws, and thorough sanding for a safe, lasting build.
Proper Wood Gluing Techniques
Proper wood gluing is paramount when following 16x20x24 plyo box plans PDF for a durable structure. Apply a generous, even coat of wood glue to all joining surfaces – don’t skimp! Clamping is crucial; ensure adequate pressure is applied across the entire joint while the glue dries, typically for at least 24 hours.
Wipe away any excess glue immediately with a damp cloth to prevent a weak bond and ensure a clean finish. Consider using biscuits or dowels in conjunction with glue for added reinforcement, particularly at stress points. A strong glue joint is the foundation of a safe and reliable plyo box, capable of withstanding repeated impact.
Screw Placement for Maximum Strength
When building from 16x20x24 plyo box plans PDF, strategic screw placement is vital. Stagger screws rather than lining them up to distribute stress and prevent splitting. Predrill pilot holes slightly smaller than the screw diameter to avoid wood cracking and ensure a secure hold. Focus on reinforcing corners and seams with multiple screws.
Counter-sink the screw heads for a flush finish and to prevent snagging during use. Utilize screws of appropriate length – long enough to penetrate deeply into both wood pieces, but not so long they protrude. Prioritize screw placement along grain direction for optimal strength and stability.
Sanding and Finishing for Smooth Edges
Following 16x20x24 plyo box plans PDF, thorough sanding is crucial for safety and durability. Begin with a coarser grit (80-120) to remove imperfections, then progress to finer grits (180-220) for a smooth surface. Pay special attention to edges and corners, rounding them slightly to minimize injury risk during plyometric exercises.
After sanding, consider applying a sealant or finish to protect the wood and enhance grip. Options include polyurethane, varnish, or a rubberized coating. Ensure the finish is fully dry before use to prevent slippage. A smooth finish extends the box’s lifespan.

Safety Features & Considerations
16x20x24 plyo box plans PDF emphasize rounded edges and non-slip surfaces for injury prevention. Weight capacity testing is also vital for safe use.
Rounded Edges to Prevent Injury
Plyo box plans PDF, particularly those for a 16x20x24 size, consistently highlight the critical importance of rounded edges. Sharp corners present a significant risk of bruising, cuts, or more serious injuries during dynamic movements like box jumps or step-ups.
Careful sanding and potentially the addition of edge protectors are recommended during construction. This detail isn’t merely aesthetic; it’s a fundamental safety feature; A well-constructed box prioritizes user well-being, and rounding edges is a simple yet effective method to minimize potential harm. Always prioritize safety when following plyo box plans PDF.
Non-Slip Surface Options (Rubber Coating, Grip Tape)
When reviewing 16x20x24 plyo box plans PDF, don’t overlook surface traction. A smooth wood surface can become dangerously slippery, especially during high-impact plyometric exercises. Implementing a non-slip solution is paramount for safety and performance.
Common options include applying a textured rubber coating or strategically placed grip tape. Rubber coatings offer comprehensive coverage, while grip tape provides targeted traction on the box’s top surface. Consider the cost and durability of each option when choosing. Prioritizing a secure footing, as detailed in many plyo box plans PDF, minimizes the risk of slips and falls.
Weight Capacity & Testing
Analyzing 16x20x24 plyo box plans PDF reveals crucial weight capacity considerations. A well-constructed box, built according to plans, should safely support the user’s weight plus the impact force of jumps. Typically, a robustly built box can handle 300-500 lbs, but this varies with materials and construction.
Before regular use, rigorous testing is essential. Gradually increase the weight applied – starting with static loads, then progressing to dynamic jumps. Inspect for any signs of stress or instability. Many plyo box plans PDF emphasize thorough testing to ensure structural integrity and user safety.

Finding & Utilizing PDF Plans
16x20x24 plyo box plans PDF are abundant online, from sites like health-bent.com and wikiHow, offering step-by-step guides for DIY construction.
Reputable Sources for Plyo Box PDFs
Finding reliable 16x20x24 plyo box plans PDF requires discerning sources. Health-bent.com provides a detailed, modifiable plan, alongside a step-by-step guide, though some builders suggest alterations. wikiHow offers comprehensive instructions with pictures, suitable for beginners. Numerous fitness and DIY websites host plans, but verifying accuracy is crucial.
Always assess the plan’s clarity, material list, and safety considerations. User reviews and forum discussions can offer valuable insights into a plan’s buildability and durability. Prioritize plans that emphasize structural integrity and proper dimensions for safe plyometric training. Remember to cross-reference information and adapt plans to your skill level.
Interpreting PDF Plans & Diagrams
Decoding 16x20x24 plyo box plans PDF begins with understanding the diagrams. Pay close attention to wood piece dimensions, typically listed in inches. Identify the base, sides, and top components, noting quantities needed. Examine cut angles and joinery methods – screws, glue, or nails.
Brace placement is vital for structural integrity; diagrams illustrate internal support. A bill of materials lists all required supplies. Ensure you comprehend the assembly sequence before cutting any wood. Look for exploded views showing how pieces fit together. If unclear, seek clarification online or from experienced builders.
Modifying Plans to Suit Your Needs
Adapting 16x20x24 plyo box plans PDF allows personalization. Adjust dimensions if space is limited, but maintain structural integrity. Reinforce corners with extra bracing for heavier use. Consider adding a non-slip surface like rubber coating or grip tape for safety.
Experiment with different wood thicknesses based on budget and desired durability. Modify the design to create a 3-in-1 box with varying heights. Always prioritize safety when altering plans; ensure modifications don’t compromise stability. Thoroughly test any changes before use.

Advanced Plyo Box Designs
16x20x24 plyo box plans PDF inspire variations like 3-in-1 designs or soft boxes. Adjustable height options offer versatile training for all fitness levels.
3-in-1 Plyo Box Variations
Utilizing 16x20x24 plyo box plans PDF as a foundation, builders often explore 3-in-1 designs for enhanced versatility. These boxes cleverly incorporate three different heights within a single structure, typically by rotating the box to expose varying surfaces. This eliminates the need for multiple boxes, saving space and cost.
Construction involves carefully angled cuts and robust internal bracing to ensure stability at each height setting. The plans often detail specific dimensions for each surface, catering to beginner, intermediate, and advanced athletes. Safety is paramount; therefore, secure locking mechanisms are crucial to prevent accidental rotation during exercise. These multi-height boxes maximize training options.
Soft Plyo Box Construction (Foam Padding)
While 16x20x24 plyo box plans PDF typically focus on wood, a softer alternative utilizes foam padding. This construction prioritizes impact absorption, reducing stress on joints – ideal for beginners or recovery. The core often consists of a wooden frame, providing structural integrity, then encased in high-density foam.
Selecting the appropriate foam density is crucial; too soft, and it won’t provide sufficient support. Covering the foam with durable vinyl or canvas protects it from tearing and enhances grip. These boxes are lighter and easier to move, but require more frequent replacement due to foam compression.
Adjustable Height Plyo Boxes
Beyond standard 16x20x24 plyo box plans PDF, adjustable designs offer versatility for all fitness levels. These typically feature a central wooden box with removable inserts, allowing height modification. Users can switch between 16”, 20”, and 24” (or other increments) to progressively challenge themselves.
Safety is paramount; inserts must lock securely to prevent shifting during exercise. Robust locking mechanisms, like heavy-duty pins or latches, are essential. While more complex to build than fixed-height boxes, adjustable models maximize functionality and cater to a wider range of plyometric exercises.

Plyometric Exercises to Perform with Your Box
16x20x24 plyo box plans PDF unlock diverse exercises: box jumps, step-ups, and depth jumps; These build power, speed, and endurance, enhancing athletic performance.
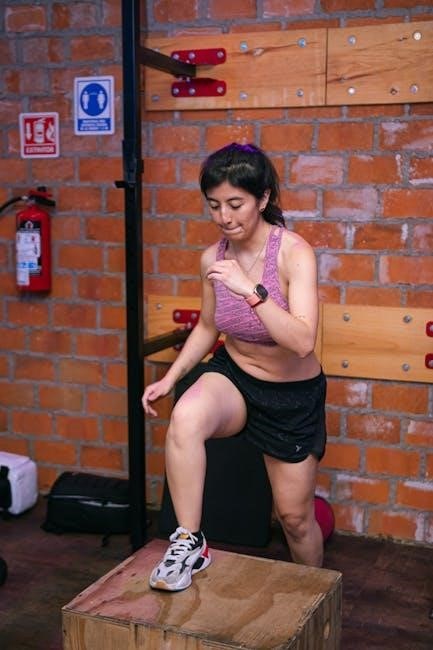
Box Jumps (Beginner to Advanced)
Box jumps, facilitated by your 16x20x24 plyo box plans PDF creation, are foundational plyometric exercises. Beginners start with lower heights, focusing on soft landings. Gradually increase the box height as strength and technique improve. Proper form involves a powerful leg drive, arms swinging for momentum, and landing quietly with bent knees.
Advanced athletes can explore variations like single-leg box jumps or consecutive jumps. Remember safety: ensure adequate space, a stable box (thanks to your careful construction!), and controlled movements. Box jumps enhance explosive power, crucial for athletic performance and overall fitness. Consistent practice, guided by your DIY box, yields significant results.
Step-Ups & Box Squats
Utilizing your 16x20x24 plyo box plans PDF build, step-ups and box squats offer versatile strength training. Step-ups target unilateral leg strength – one leg at a time – improving balance and stability. Focus on driving through your heel and maintaining a controlled descent. Box squats, conversely, build overall lower body power.
Adjusting box height allows for progressive overload. Lower heights emphasize technique, while higher heights increase intensity. Both exercises enhance functional strength, beneficial for daily activities and athletic pursuits. Remember proper form: maintain a straight back and engage your core throughout each repetition, maximizing the benefits of your DIY plyo box.
Depth Jumps & Other Explosive Movements
With a 16x20x24 plyo box constructed from your plans PDF, unlock advanced plyometrics like depth jumps. These build reactive strength – the ability to quickly transition from eccentric to concentric muscle actions. Carefully step off the box, minimizing ground contact time before jumping explosively upwards.
Other movements include box jump variations (single leg, lateral) and explosive lunges. Prioritize proper landing mechanics to mitigate injury risk. Depth jumps are high-impact; ensure adequate strength and conditioning before attempting. Remember, plyometrics enhance power, speed, and athletic performance, making your DIY box a valuable training tool.

Maintaining Your Plyo Box
Regularly inspect your 16x20x24 plyo box, built using your plans PDF, for damage. Clean and store it properly to ensure longevity and safety.
Regular Inspection for Damage
Consistent inspection is crucial for a safely functioning plyo box, especially one constructed from 16x20x24 plyo box plans PDF. Before each use, meticulously examine the entire structure. Look for cracks in the wood, particularly at joints and corners, where stress is concentrated.
Check all screws and fasteners to ensure they remain tight; loose fasteners compromise structural integrity. Pay close attention to any areas showing signs of wear, splintering, or delamination of the plywood. If you notice any damage, immediately discontinue use until repairs are completed. A proactive approach prevents potential injuries and extends the box’s lifespan.
Cleaning & Storage Recommendations
Maintaining your plyo box, built using 16x20x24 plyo box plans PDF, is simple. Regularly wipe down the surface with a damp cloth to remove dust, chalk, and sweat residue. Avoid harsh chemicals or abrasive cleaners that could damage the wood or any applied finish.
For storage, choose a dry, well-ventilated area, ideally indoors, to prevent moisture damage. Protect the box from direct sunlight and extreme temperatures. If storing outdoors temporarily, cover it with a tarp. Proper storage extends the box’s life and ensures it remains safe for future workouts.
Repairing Minor Issues
Even with careful construction from 16x20x24 plyo box plans PDF, minor damage can occur; Loose screws should be tightened immediately. Small cracks in the wood can be filled with wood glue and clamped until dry. Sand any rough spots after repairs to prevent splinters.
If the non-slip surface wears down, reapply grip tape or rubber coating. For more significant structural damage, consult a woodworking professional. Prioritize safety; a compromised plyo box is a hazard. Regular inspection, guided by your plans, helps catch issues early.